CRAFTING WHEN WE CAN CHALLENGES

Followers

Friday, 22 February 2013

Beccy's Place Challenge #4 - Use a February freebie.

This is the last of Beccy's Birthday Challenges.  I've really enjoyed doing these and they have re-inspired me as I had lost the will to craft.  I chose the Pine Forest because I love the depth this image has.  I re-coloured the image in Craftartist to Green then made 3 mats using Promarkers and Copics as close as I could to the colours in the image to frame the layers.  I then went around each edge with a Sakura calligraphy pen in gold.  I used my Cuttlebug swiss dot embossing folder to make a larger mat (it reminded me of falling snow).  I then made the base layer and coloured it with the mid green tone and then edged it in gold.  Finally stuck this onto the base A5 card.    I then sat and looked at it for a while and decided it needed some embellishments.  I googled "making pinecones using punches" and t pinecone tutorial popped up (to my surprise).  Kittie at Kitties Kraft has made a tutorial for flat pinecones so using this for inspiration I set to with my a ancient Create and Craft punch, a pair of scissors, scattered straw DI and Pinflair glue gel and made my own little pincones.  I then used a gold senitment my MIL brought back for from her holiday (along with a bag of ribbon and tassels she has acquired from chocolate boxes etc) to balance up the card.  Pheww if you made it to here you have alot of patience.  Here is my card and I'm pretty darned pleased with it.


Challenges

Beccy's Place #4 - Use a Febrauary freebie 


Wednesday, 20 February 2013

Beccy's Place - Challenge 3 - not a rectangle

Nearly missed this challenge. Time just flies by, the days merge and the hours disappear.

For Challenge 3 we had to make something that wasn't a rectangle so I made another diamond shape card.  This time it has a top fold, I think this is a tent fold but not sure.  It was supposed to be a normal side opening but when I cut the squares for the background I did it facing the wrong way and I didn't like the card leaning backwards so it became a top fold card.  The image is a freebie one Beccy gave away awhile ago.  Coloured with Copics and Promarkers,  The background is squares coloured in the same colours as the image and stuck onto a template of the shape them cut to the right size and stuck on the card.  Then, if I had a brain cell, is when I should have applied the peeloffs but until I stuck the pony on I didn't realise how unfinished the squares looked, so with a bit of fiddly manoeuvring I applied the silver wavy peeloff.  The number 2 was made using a punch I created using CraftArtist.  It was punched from the backend of the pony and coloured the same.  When I find my craftwork sentiments I will be putting on a Happy Birthday sentiment.


Challenges

Beccy's Place 3 - Not a rectangle


Sunday, 17 February 2013

Crafting When We Can Challenge 38 - Birthstone

I can't believe how quick the weeks are passing and what's with the English weather. In one day we had strong winds, brilliant sunshine and snow.  I colleague of mine said that's why the British probably talk about the weather so much as it's always changing and we never know what's next.

Anyhoo onto my card for this challenge.  We are sponsored by the talented Krista at


Theme

Birthstones

I printed the image onto watercolour paper using a laser printer (what a performance that was).  I then used some mica paints I bought from The Works years ago, it must be a least 7 to create the picture.  It wasn't going to be a full scene but I made a mistake with the blue so turned it into water and sky.  Then I added a green stripe for the land and silver clouds in the sky.  

I know the image Cerridwen  is butterflies but I like her emerging from the water with the butterflies helping to dry her hair by holding it in the wind.

The blue wasn't the only error I made I coloured her dress in purple and green orginally then when I went to post my card I realised that the theme was birthstones so I re coloured the dress.  I had to find a birthstone and found Alexandrite which is a reddy purple.  Then added the picture to CraftArtist and made a card around it.  I used the digikit Inkblot Butterflies.

I think what I will do is print out and give my daughter the card and frame the picture as I really like it and the mica paint make it shiny.  OOOooo shiiiiny.

Here is the card and the original picture


Hop over to the Challenge and leave us your Birthstone inspired projects. 

Wednesday, 13 February 2013

Beccy's Place - Birthday Challenge 2 - white on white

I've never done white on white, my white always ends up with a big smudgy fingermark or glue blob I've tried to rub off but this time I'm quite please with the results.  These 2 cards are made from white card from my stash and my own designs made up on the Craftrobo.  I've designed my own stamp edge base card and the lattices used as background texture too.  The butterflies are from a punch and the stamps are from Lindsay Mason designs and Docrafts.  The frame is embossed with the cuttlebug swiss dot folder and the stamping is seedless preserve DI.

This is my daughter's favourite

 This is my favourite even if I didn't notice the sentiment was off centre until I was putting the butterflies on.  The stamping is seedless preserve DI even though it looks black.

CHALLENGES

Beccy's Place B'day #2 - white on white
Simon says Stamp - white on white (I've used a cuttlebug swiss dot embossing folder for the frame)


Sunday, 3 February 2013

Crafting When We Can Challenges #37 - Slugs and Snails and Puppy Dog Tails (cards for Boys)

Challenge 36 over at CWWCC was awesome.  The wonderful people who enter our Challenges are so talented and it is so difficult to choose a Winner and Top 3. 

Our Sponsor for this Challenge is the talented Kenny K from 

The DT were given the chance to choose their own image and I chose 

I firstly made a tyre tread template using my Craftrobo.  I then inked this with DI to make a tyre track across my card.  I kept the design simple (it is for a male after all) by inserting my image onto a background from CraftArtist, using the beach digikit.  I then coloured in my image with Copics and Promarkers using an Inkssentials opaque pen for the white wall tyres and highlights on the car.  The sentiment is from Craftwork cards and the gold bling is actually a crystal one coloured with my Sakura Calligrapher gold pen as was the border on the mat for the image.  The smudge you can see on the image is my finger, I always have to stick my finger on things to see if they are dry, they never are.  My finger prints are all over my cards, anything wet or sticky will have a fingerprint in it, guaranteed. 


 Now it's your turn to show us your 'Slugs and Snails' project it can be anything as long as it follows our simple rules.


CHALLENGES

OLLCB #122 - Wheely Good
Cards for Men 2 - Transport
Bunny Zoe's Crafts - Anything Goes
Crafty Boots Challenges - New (new card for base, new template for tracks, new image
Paper Pretties - Square Cards

Friday, 1 February 2013

Shock and horror, what's this?

'B' for birds

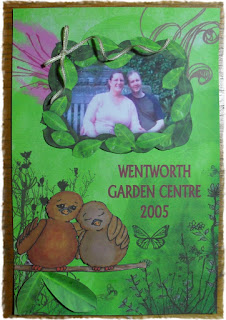
Today I am doing something I always promised myself I would never do.  I am posting a picture of myself and my OH.  It's 7 years old but still it's me.  

Over at Beccy's Place she is running 4 Birthday Challenges and this challenge is to use one of her images beginning with "B" and use it in papercraft project.  When I saw this image, I knew the picture I wanted to use.  The image is 2 birds sat on a holly branch but I cut off the holly. 

I first made it as digi scrap page but because the rules said papercraft I changed it to A4 and printed out some of the elements, coloured them with Copics and Promarkers and then stuck them back on.  I used Inkblot Butterflies from a Craftartist digikit to make the background and frame, a piece of ribbon from my stash for the bow and popped up the frame and image with pinflair glue


Here is the digi version.  I like to use a 12 x 12 template

The colours came out much deeper on the printout than on screen.  I prefer the colours on the digi page.  I coloured in the image then scanned it into the page and used cutout studio to go around the edge.  I always try to leave the artists logo on the image wherever possible.  I like to give credit where it's due.